How to make a Rainbow Brite Style doll
box
 |
| Rainbow Brite Dolls in custom boxes |
This is a cross post from the main website tutorial here.
Tools you will need to re-create the
box
a: Utility Knife (for heavy cutting)
b: Xacto Knife (for detail cutting)
c: Ruler/yard Stick
d: pencil
e: Scoring Board (for making creases)
f: rubber gloves (to minimize the oil
from your hands from over handling.)
g: glue
h: Velcro with adhesive back
i: silica packets (optional)
j: poly bags/head wraps for dolls
(optional)
To re-create my Rainbow Brite Doll box,
I used an old one to get the measurements and parts.
The box consisted on the following:
A: 1 Box
B: 1 Cardboard insert
C: 3 Lengths of plastic coated wire.
D: 1 clear plastic window (9 ½ in x 6
½ in)
To make each box, I need a hard
template/stencil to re-use as I need a new box. I decided to buy some
foam core board from my local hobby shop for this.
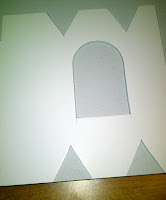
I clamped the old box down flat onto
the foam core board and traced the old box onto the surface. The
clamps keep the box from moving as I go around with my pencil.
Include the center/window of the box as well. Once done I remove the
old box and use a box cutter/utility knife to cut out the shape. It
is best to use the Xacto Knife for the window, as you need to be
detailed with the curve of the shape if you intend to duplicate the
same curve.
If you do not have an old box to make
your template from, you will find measurements below for what I used.
 |
| Insert Measurements (Click to enlarge) |
 |
| Box Measurements (click to enlarge) |
Now lets start making your box.
You need the following:
A: Heavy Poster Board (minimum 18 3/8 in
x 18 3/8 in is needed for each box)
B: ¼ sheet cake board (or 10 x 11 6/8
in corrugated card board)
C: Spool of clear plastic coated wire
(9 ½ inch lengths are used to mount doll)
D: Transparency Sheets
The box itself is made out of a thick
poster board I got from an office supply store. Chip board is too
thick, and regular poster board is too thin. The heavy poster board
is the closest to the real box weight I was able to locate. You can
make one box per sheet of poster board.
To create your box, clip the template
to the poster board. I find putting it next to the corner of the
paper will assure you get a straight and even line for two sides of
your board.
After you have traced the outline,
un-clip the template, and use a yard stick and the utility knife to
get a straight cut around the other sides of the outline, so you have
a rectangle. The other parts of the box are triangles, so use a ruler
to assure those straight cuts, and finish cutting away the other
negative areas of your outline.
Now that you have your box shape cut,
you need to make the creases. The best tool for this is a “Scoring
Board”. Martha Stewart has a nice large one available at most craft
stores.
To score your box, lay the box on the
scoring board, and using it's tool, press firmly and follow the
groove from one end of the box to the other. Do that for all areas
that need to be creased. This includes the folds at the top and sides
(see picture)
When you make a crease it will darken
the area but this will not be visible when you fold the box.
Next cut the window out of the center
of the box if you haven’t done so already, and the extra cut in the
closing flaps. You should know where this is now that you have made
your creases.
Next you will need to glue down your
window. The transparency sheet is too wide to fit as it is, so you
will need to cut off the extra width. Once cut in to the correct
size, draw a line of glue around the inner window of the box about a
half inch. Once it's done, place the clear transparency film down
over the window. Press down on the glue trail, and move your finger
out away from window. This will spread the glue out and make sure it
lays flat.
Lay the box down and let the glue dry.
After it has dried, fold the box on the
crease you created until it meets the end. Draw a line of glue along
the end and use a pair of clips to clamp the two pieces together.
Make sure the seam is flat and the glue is not leaking out the
cracks. You can better assure the seam if you used two rulers on
either side of the board and clamp that down so that it's being held
down from one end of the box to the other.
If you don't do this, you just need to
hold down the seam by hand until it sticks enough on it's own and the
clamps on the ends will keep it from coming apart.
While this is drying, you can work on
the insert.
The insert for the box was originally a
colored piece of very thin cardboard, but I wasn't able to duplicate
this. Instead I used ¼ sheet cake boards. It is the correct width.
You will need to trim off the extra length from the top.
Next comes the detail cutting for the
insert. To assure the proper folds to fit in the box you will need to
make a series of cuts in the back of the board (the brown part). Only
two have to go all the way through the board. The others are only for
the folds, so only have to be through the brown part.
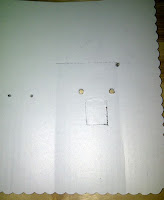
You also need to punch a few holes
through the cardboard too. These holes are what the wire goes through
to mount the doll.
Depending on what doll you are mounting
you may need more then two. All of the box inserts will need to hold
the doll body. You will need extra parts to hold hair. For example
the one I am working with is for “Rainbow Brite”, and in addition
to holding her to the board, I also need a wire and holes to hold
back her ponytail. Also, if your doll has a sprite, you may need to
punch a set of holes to mount the sprite.
After all boards are cut and the box is
dried, it's time to put the box together.
Fold in the flaps of the box and secure
the box with Velcro. This way you can open the box later to adjust or
add items as you find them.
Next cut wire, 9 ½ to 10 inch lengths.
Before mounting your dolls you may want
to adjust their hair and wrap them. If you do this, you can use 4 –
5 inch poly backs cut into 2 inch rings to wrap around their heads
and keep their bangs down.
Once you know your doll is ready, put
the wire under the dress and out the sleeves. Feed the wire around
the back of the doll and into the holes you punched in the center of
the board. Turn the board and doll over and twist the wire firmly.
When you turn the board back over the doll is now firmly mounted in
the middle of the board.
Next, use another length of wire to
secure the doll's hair if it needs it the same as you secured the
body of the doll.
Now, secure the doll's sprite if
available.
Lastly, slide the cardboard insert with
mounted doll into the box.
 |
| Rainbow Brite and Twink reboxed! |
Secure the other end of the box with
Velcro. Add a silica packet if you like to keep away moisture, and
you are done.


No comments:
Post a Comment