One of the many problems with Rainbow Brite dolls is their Color Belts going missing. The dolls belts were originally glued on their dresses and after a few years many of them fell off and are missing. I decided to check for a way of getting a belt on missing dresses, so I asked a friend who did embroidery to help me. She took a few of my belt less dolls and looked up a pattern and attempt to put it on one of the older dresses. You need to be careful with this, because the dresses are made of nylon and could tear.
Either way, we were successful!
We located a nice "Shooting Star" pattern, and were able to adjust the colors to match, and put it on a dress. Here is the finished product:
The design also works on the larger dresses as you can see here.
You can find the pattern for this here: Shooting Star Pattern
I hope this helps you also!
Have a Rainbow Day!
Search Rainbow Brite's Blog
Showing posts with label How To. Show all posts
Thursday, August 8, 2013
Monday, July 29, 2013
My Rainbow Room/Color Cave: Update 04
Hey Color Kids,
I know it's been a long while since my last "Collection/Color Cave/Rainbow Room" update. I hit a few bumps. Beyond personal issues/illness I also hit some design bumps.
First, the shelves I painted seemed too tacky to use as is, so for my top shelf, I actually purchased two 7 inch wide pre-made shelves for the main boxed dolls. Also, I was short several brackets so I bought more.
Then I attempted to arrange the shelves to best show as much of my collection as possible. Before I could put them up, I had to box them. You can find out the details behind making your own Rainbow Brite style display box in this entry here. How to make a Rainbow Brite Style Display Box.
That and when it comes to game playing and movie watching, I don't have to worry about window glare!
As you can see from the shallowness of the shelves I made a lot of room by putting brackets on the side of the shelve as well as the back. these side shelves also hold dolls. These aren't how my display is now, trust me. I've been moving shelves around everyday. I think they may move even more until this project is done. LOL
I know it's been a long while since my last "Collection/Color Cave/Rainbow Room" update. I hit a few bumps. Beyond personal issues/illness I also hit some design bumps.
First, the shelves I painted seemed too tacky to use as is, so for my top shelf, I actually purchased two 7 inch wide pre-made shelves for the main boxed dolls. Also, I was short several brackets so I bought more.
![]() |
| Closet with painted shelves. |
It was when I created my original dozen and displayed them that I realized how much I really LIKED the way the boxes looked and also knew I was going to need much more if I wanted to display my WHOLE collection. My whole collection is NOT going to FIT in the closet. I tried to display a few items I had, the core dolls from each release and this is what I got:
As you can see the boxes look good. I love how the color pops for each doll. Still I have much more to display, and many more to box. This got me to thinking, I really need to use the whole room to display my collection, but I don't want to risk the dolls fading. So a NEW plan was hatched! UV Protective Film!
![]() |
| The front of the closet with boxed dolls |
While at Lowes looking for brackets I turned to window treatments and saw some UV film to protect your furniture from fading. I selected the highest UV protection possible. While this does happen to be BLACK UV film, it does allow light and I can still use my window but it doesn't allow 99% of UV light which should keep my items from fading! I don't know about you, but I felt such a release of not being restricted. Between the custom made boxes to protect from dust and now the UV film to protect from fading, I can enjoy my collection even more.
That and when it comes to game playing and movie watching, I don't have to worry about window glare!
So I am wanting to keep the main dolls in the closet for their protection, and I started working on what I would display around my room, since I was going to be using the whole space for everything else I have. The space isn't finished now, and I will go over the details when they are, but here are some cute ideas that you may enjoy too!
One I like is Recycle Wrapping Paper: I have old wrapping paper from Rainbow Brite. This paper is so adorable, I wanted to use it in the room, so I went to my local Hobby Lobby and had a section dry mounted on foam board. This section of paper can now be mounted on my wall as a poster! I recommend dry mounting to anyone who has paper items they want to display. This isn't archival safe, but rather just for show. I will preserve a copy of the paper as well in my archives, but it is fun for other things. Also, considering how much paper you can get in a roll, you can give "posters" away as gifts to other Rainbow Brite fans!
![]() |
| Vintage, New and Homemade Posters! |
Don't be afraid to DIY: Do It Yourself Projects: If there is something you can make on your own it is tons of fun and personalizes YOUR space to you! In my space I have become such a crafter! I share everything I make with fans as I do it because I think you will enjoy it too! I made Home Made Projector Night Lights for Rainbow Brite, Custom Display Boxes, and Posters so far! I had no idea how many ideas I had until I started working on this project. You never know what you can come up with too! Don't be afraid to try! and if successful SHARE it with fans!
Oh, and for those who were curious of the left and right sides of the closet here are some pictures:
![]() |
| The Left Side |
![]() |
| The Right Side |
The Right Hand side of the shelve is also different. I'm attempting to use the closet as custom book shelves too. I keep a lot of the heavy items to the bottom of the shelves. This is incase anything does fall it doesn't fall far. You can see a lot of my books and videos here. This display will change too as I go through my collection.
If there is anything specific you were curious about with this project, or if you have any suggestions for my collection, let me know! I hope to have more for you soon, but if this takes a long time to complete, don't be discouraged. It's a learning process! LOL
Please be sure to check the website and this blog for any more "Do it yourself" ideas I may come up with to help with displays!
My current project is making more boxes for dolls (Variants) and cleaning up SPRITES! Oh boy the trial and error of cleaning those poor little guys.
Thanks for reading, until next time
HAVE A RAINBOW DAY!
Thursday, July 25, 2013
How to make a Custom “Rainbow Brite” project-able Night Light
This is a fun way to make a custom Rainbow Brite Night Light. Please note: this project requires tools and dealing with electronics, so please only an adult should attempt this project.
First take a “Projectable Night
Light”. I chose a blue one with silver base. This one normally
projects an underwater scene with fish.\
Next carefully take a tri-wing
screwdriver, (you can find these as part of a security screwdriver
set at most local hardware stores). Remove the three triangle shaped
screws.
Next carefully remove the front of the
silver plate. This will expose the inner workings of the night light.
We don't want to mess with any of these.
Next carefully dismount the projector
ball. It is held on with a spring on each side. This allows it to
rotate yet still brings power to the LED light inside.
Carefully take apart the projector ball
and remove the projector inside. The small round film that is the
slide image will come out. This is the image we will be replacing.
What can we replace the image with?
You can use two things that I know of.
1: a view master reel. The view master
film frame is nearly as small as the projector film. You will need a
hole puncher or Xacto knife to cut the correct shape.
2: a Rainbow Brite projector film cell.
These were from the Rainbow Brite and the Star Stealer trailer from
the 1980's. The film cells are very big in comparison to the tiny
cell you need for the projector, so select a scene that is a wide
shot, or a specific character you want projected. You will also need
a hole puncher or Xacto to cut the film in the correct shape.
Next, slide the new cell in the place
of the old one and put the projector back together.
Once back together, you should get
something that looks like this:
the method I chose was a Film Cell. It
is of Rainbow Brite, Starlite, and Twink riding a rainbow. It's a
nice “window” in to Rainbow Land that I can project onto my wall,
ceiling or anywhere I choose.
Please note the clarity of the image depends on the quality of the image, the distance from the light to the surface you are projecting on and if your cell is laying completely flat inside the projector.
You can currently find a set of cells on Ebay here.
If you try this project, what method
did you do? And what image did you get?
Let us know!
Have a Rainbow Day!
Have a Rainbow Day!
Monday, July 15, 2013
How to: Make a Rainbow Brite Style Display Box
How to make a Rainbow Brite Style doll
box
![]() |
| Rainbow Brite Dolls in custom boxes |
This is a cross post from the main website tutorial here.
Tools you will need to re-create the
box
a: Utility Knife (for heavy cutting)
b: Xacto Knife (for detail cutting)
c: Ruler/yard Stick
d: pencil
e: Scoring Board (for making creases)
f: rubber gloves (to minimize the oil
from your hands from over handling.)
g: glue
h: Velcro with adhesive back
i: silica packets (optional)
j: poly bags/head wraps for dolls
(optional)
To re-create my Rainbow Brite Doll box,
I used an old one to get the measurements and parts.
The box consisted on the following:
A: 1 Box
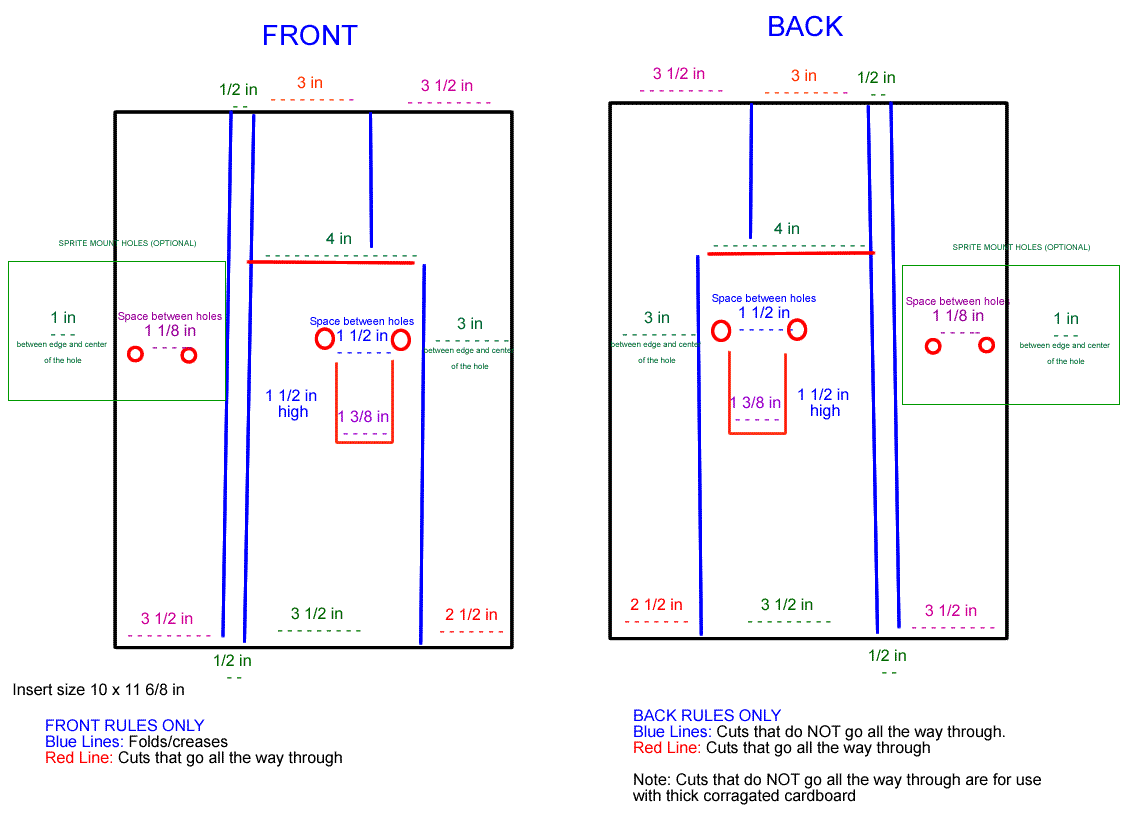
B: 1 Cardboard insert
C: 3 Lengths of plastic coated wire.
D: 1 clear plastic window (9 ½ in x 6
½ in)
To make each box, I need a hard
template/stencil to re-use as I need a new box. I decided to buy some
foam core board from my local hobby shop for this.
I clamped the old box down flat onto
the foam core board and traced the old box onto the surface. The
clamps keep the box from moving as I go around with my pencil.
Include the center/window of the box as well. Once done I remove the
old box and use a box cutter/utility knife to cut out the shape. It
is best to use the Xacto Knife for the window, as you need to be
detailed with the curve of the shape if you intend to duplicate the
same curve.
If you do not have an old box to make
your template from, you will find measurements below for what I used.
![]() |
| Insert Measurements (Click to enlarge) |
![]() |
| Box Measurements (click to enlarge) |
Now lets start making your box.
You need the following:
A: Heavy Poster Board (minimum 18 3/8 in
x 18 3/8 in is needed for each box)
B: ¼ sheet cake board (or 10 x 11 6/8
in corrugated card board)
C: Spool of clear plastic coated wire
(9 ½ inch lengths are used to mount doll)
D: Transparency Sheets
The box itself is made out of a thick
poster board I got from an office supply store. Chip board is too
thick, and regular poster board is too thin. The heavy poster board
is the closest to the real box weight I was able to locate. You can
make one box per sheet of poster board.
To create your box, clip the template
to the poster board. I find putting it next to the corner of the
paper will assure you get a straight and even line for two sides of
your board.
After you have traced the outline,
un-clip the template, and use a yard stick and the utility knife to
get a straight cut around the other sides of the outline, so you have
a rectangle. The other parts of the box are triangles, so use a ruler
to assure those straight cuts, and finish cutting away the other
negative areas of your outline.
Now that you have your box shape cut,
you need to make the creases. The best tool for this is a “Scoring
Board”. Martha Stewart has a nice large one available at most craft
stores.
To score your box, lay the box on the
scoring board, and using it's tool, press firmly and follow the
groove from one end of the box to the other. Do that for all areas
that need to be creased. This includes the folds at the top and sides
(see picture)
When you make a crease it will darken
the area but this will not be visible when you fold the box.
Next cut the window out of the center
of the box if you haven’t done so already, and the extra cut in the
closing flaps. You should know where this is now that you have made
your creases.
Next you will need to glue down your
window. The transparency sheet is too wide to fit as it is, so you
will need to cut off the extra width. Once cut in to the correct
size, draw a line of glue around the inner window of the box about a
half inch. Once it's done, place the clear transparency film down
over the window. Press down on the glue trail, and move your finger
out away from window. This will spread the glue out and make sure it
lays flat.
Lay the box down and let the glue dry.
After it has dried, fold the box on the
crease you created until it meets the end. Draw a line of glue along
the end and use a pair of clips to clamp the two pieces together.
Make sure the seam is flat and the glue is not leaking out the
cracks. You can better assure the seam if you used two rulers on
either side of the board and clamp that down so that it's being held
down from one end of the box to the other.
If you don't do this, you just need to
hold down the seam by hand until it sticks enough on it's own and the
clamps on the ends will keep it from coming apart.
While this is drying, you can work on
the insert.
The insert for the box was originally a
colored piece of very thin cardboard, but I wasn't able to duplicate
this. Instead I used ¼ sheet cake boards. It is the correct width.
You will need to trim off the extra length from the top.
Next comes the detail cutting for the
insert. To assure the proper folds to fit in the box you will need to
make a series of cuts in the back of the board (the brown part). Only
two have to go all the way through the board. The others are only for
the folds, so only have to be through the brown part.
You also need to punch a few holes
through the cardboard too. These holes are what the wire goes through
to mount the doll.
Depending on what doll you are mounting
you may need more then two. All of the box inserts will need to hold
the doll body. You will need extra parts to hold hair. For example
the one I am working with is for “Rainbow Brite”, and in addition
to holding her to the board, I also need a wire and holes to hold
back her ponytail. Also, if your doll has a sprite, you may need to
punch a set of holes to mount the sprite.
After all boards are cut and the box is
dried, it's time to put the box together.
Fold in the flaps of the box and secure
the box with Velcro. This way you can open the box later to adjust or
add items as you find them.
Next cut wire, 9 ½ to 10 inch lengths.
Before mounting your dolls you may want
to adjust their hair and wrap them. If you do this, you can use 4 –
5 inch poly backs cut into 2 inch rings to wrap around their heads
and keep their bangs down.
Once you know your doll is ready, put
the wire under the dress and out the sleeves. Feed the wire around
the back of the doll and into the holes you punched in the center of
the board. Turn the board and doll over and twist the wire firmly.
When you turn the board back over the doll is now firmly mounted in
the middle of the board.
Next, use another length of wire to
secure the doll's hair if it needs it the same as you secured the
body of the doll.
Now, secure the doll's sprite if
available.
Lastly, slide the cardboard insert with
mounted doll into the box.
![]() |
| Rainbow Brite and Twink reboxed! |
Secure the other end of the box with
Velcro. Add a silica packet if you like to keep away moisture, and
you are done.
Saturday, June 22, 2013
My Rainbow Room/Color Cave: Update 03
Hey Color Kids.
I started working more on the "Color Cave" this weekend.
First thing I did was paint the shelves. That is going to take a while to finish that project. I live in Florida and it's summer. During the summer in Florida it rains nearly every day at 3 - 4pm. The humidity is so bad that it takes a long time for the paint to dry between coats.
I did buy some items in hopes that they would make the painting time better. They are little painters pyramids. You paint both sides of the boards and they hold them off the ground so they can dry underneath too. I didn't have enough for all my boards, so a lot of the boards only got painted on one side today. I'm hoping the rest of this weekend will be milder outside and I can paint the rest. I need to keep up the painting because the sap from the boards was starting to flow again...didn't know it would do that, so I'm hoping to get them all painted soon to stop that and continue putting my room together. All my collection is still boxed up until I do.
Until then though I am still prepping my collection for display once I can get the display finished. All of my dolls are loose, not boxed, etcetera. So I risk exposure to dust. Any collector knows you really want to keep dust away as much as possible so I hatched a plan. Display boxes!
Okay, so before you say "Hey, you can just buy clear cases to put your dolls in. Why 'make' one?"
I know they make clear acrylic doll display cases. These cases cost a lot of money. Especially if you want to use them for multiple dolls.
For example:
you can buy a 9.5" x 5" x 13" to 9.5" x 5" x 19" case from $10 - $14 each. There are several different styles and thicknesses for many different prices. You would need to get those for each doll, which is over 13 if you get one for every color kid and dress-up doll. If that were the case it would be $130 - $182.
You can even get "multi doll" displays that cost hundreds. You can get large curio cabinets with mirrors and glass that can cost hundreds or even thousands.
Some collectors have dolls in boxes already, so I thought it would be neat to make doll boxes in the style of the old/classic/original boxes for my collection. That way if put next to an original box it would be the same size and still protect the doll from dust.
All this and I think I can make all my boxes by hand and the cost be under $10 a box.
Anyway, the box is a "Trapezoid" shape when together.
All the small dolls that were in boxes were in these same boxes. That's Rainbow Brite, the Color Kids, Murky Dismal and the Dress Up Dolls.
I do have a couple of doll boxes but they are in bad condition. I figured I could use the bad boxes to make templates to make my own boxes. I did search for companies to "Die Cut" them for me, but they wanted over $1000, and I seriously can't afford that. LOL
I did a lot of trial and error over the last few years with this theory. I have been to many hobby stores searching for materials as close to the original doll box as possible. None of the hobby stores really had the right paper. I tried the Office Supply stores too, and they didn't have much either. I ordered board samples from companies, but the boards were too thick. Very much a "Goldilocks & the three bears" situation. "This is too big" or "Too Small" finally I found some that were nearly "Just right".
I will give the details to the "Box" construction in the next blog entry, once I have everything I need.
In the mean time I am still recording the Brite Cast episodes! We are currently up to Episode 4! Yay! And, we have a special "Mini cast" coming soon, so keep an eye out for it!
I hope to have more news for you soon, so until then!
Have a Rainbow Day!
I started working more on the "Color Cave" this weekend.
First thing I did was paint the shelves. That is going to take a while to finish that project. I live in Florida and it's summer. During the summer in Florida it rains nearly every day at 3 - 4pm. The humidity is so bad that it takes a long time for the paint to dry between coats.
![]() |
| Paint and rollers ready! |
![]() |
| This is boarding... |
I did buy some items in hopes that they would make the painting time better. They are little painters pyramids. You paint both sides of the boards and they hold them off the ground so they can dry underneath too. I didn't have enough for all my boards, so a lot of the boards only got painted on one side today. I'm hoping the rest of this weekend will be milder outside and I can paint the rest. I need to keep up the painting because the sap from the boards was starting to flow again...didn't know it would do that, so I'm hoping to get them all painted soon to stop that and continue putting my room together. All my collection is still boxed up until I do.
Until then though I am still prepping my collection for display once I can get the display finished. All of my dolls are loose, not boxed, etcetera. So I risk exposure to dust. Any collector knows you really want to keep dust away as much as possible so I hatched a plan. Display boxes!
Okay, so before you say "Hey, you can just buy clear cases to put your dolls in. Why 'make' one?"
I know they make clear acrylic doll display cases. These cases cost a lot of money. Especially if you want to use them for multiple dolls.
For example:
you can buy a 9.5" x 5" x 13" to 9.5" x 5" x 19" case from $10 - $14 each. There are several different styles and thicknesses for many different prices. You would need to get those for each doll, which is over 13 if you get one for every color kid and dress-up doll. If that were the case it would be $130 - $182.
You can even get "multi doll" displays that cost hundreds. You can get large curio cabinets with mirrors and glass that can cost hundreds or even thousands.
Some collectors have dolls in boxes already, so I thought it would be neat to make doll boxes in the style of the old/classic/original boxes for my collection. That way if put next to an original box it would be the same size and still protect the doll from dust.
All this and I think I can make all my boxes by hand and the cost be under $10 a box.
Anyway, the box is a "Trapezoid" shape when together.
All the small dolls that were in boxes were in these same boxes. That's Rainbow Brite, the Color Kids, Murky Dismal and the Dress Up Dolls.
I do have a couple of doll boxes but they are in bad condition. I figured I could use the bad boxes to make templates to make my own boxes. I did search for companies to "Die Cut" them for me, but they wanted over $1000, and I seriously can't afford that. LOL
I did a lot of trial and error over the last few years with this theory. I have been to many hobby stores searching for materials as close to the original doll box as possible. None of the hobby stores really had the right paper. I tried the Office Supply stores too, and they didn't have much either. I ordered board samples from companies, but the boards were too thick. Very much a "Goldilocks & the three bears" situation. "This is too big" or "Too Small" finally I found some that were nearly "Just right".
I will give the details to the "Box" construction in the next blog entry, once I have everything I need.
In the mean time I am still recording the Brite Cast episodes! We are currently up to Episode 4! Yay! And, we have a special "Mini cast" coming soon, so keep an eye out for it!
I hope to have more news for you soon, so until then!
Have a Rainbow Day!
Wednesday, June 12, 2013
My Rainbow Room/Color Cave: Update 02
Hey Rainbow Brite Fans
Here is what I have begun so far.
The closet space is about 6 ft by 2 and 1/2 feet. It already had a wire shelf and rod installed. I decided not to remove it as I can use the upper space for storage. The bottom space needed work. I decided I needed shelves about 6 inches deep and 2 feet wide. These type of board aren't available ready made, so I decided to make them. I bought 6 inch board and had the store cut them for me into 2 ft boards.
I decided on adjustable shelving so I bought 8 upright double track for brackets.
Here is a picture of the closet without the rail mounted.
It took me some trying to get good screws to mount them with. The first ones I bought were far too long. I decided to go with one about and inch and a half deep. I don't plan on these shelves holding anything but collectibles, not including books.
Each rail is about 2 feet separated so that the brackets can overlap some if I want to overlap them.
Once mounted I made sure each was level with a leveler and tested the brackets.
The following is a photo of the brackets with the unpainted wooden shelves.
Here are the corners of each, which also have brackets and smaller shelves.
I haven't been able to paint the shelves yet because of the weather. It rains nearly everyday here, which would make the paint unable to dry. It will take several coats to make them like I want, so they are currently waiting.
I also found out I need more brackets then pictured because I have more closet to fill and shelves cut.
The current cost of the shelf is $168
$6 per track rack X 8 =$48
$3 per bracket X 24 = $72
$6 per board. (I get 3 shelves per board, 4 small boards) X 8 = $48
Not bad considering I get to customize the shelf system and move it around I would like.
I still have to buy more brackets and paint. I will cover the painting in the next update!
Until then, what do you think so far?
Here is what I have begun so far.
![]() |
| The "Color Cave" Doors |
![]() |
| The inside of the doors. |
I decided on adjustable shelving so I bought 8 upright double track for brackets.
Here is a picture of the closet without the rail mounted.
It took me some trying to get good screws to mount them with. The first ones I bought were far too long. I decided to go with one about and inch and a half deep. I don't plan on these shelves holding anything but collectibles, not including books.
Each rail is about 2 feet separated so that the brackets can overlap some if I want to overlap them.
Once mounted I made sure each was level with a leveler and tested the brackets.
The following is a photo of the brackets with the unpainted wooden shelves.
Here are the corners of each, which also have brackets and smaller shelves.

I haven't been able to paint the shelves yet because of the weather. It rains nearly everyday here, which would make the paint unable to dry. It will take several coats to make them like I want, so they are currently waiting.
I also found out I need more brackets then pictured because I have more closet to fill and shelves cut.
The current cost of the shelf is $168
$6 per track rack X 8 =$48
$3 per bracket X 24 = $72
$6 per board. (I get 3 shelves per board, 4 small boards) X 8 = $48
Not bad considering I get to customize the shelf system and move it around I would like.
I still have to buy more brackets and paint. I will cover the painting in the next update!
Until then, what do you think so far?
Subscribe to:
Posts (Atom)