Search Rainbow Brite's Blog

Showing posts with label Rainbow Brite. Show all posts

Wednesday, January 4, 2017

Happy New Year Color Crystals

Hey Brites,
It's been a while, but I've been dealing with a lot of health problems the last few years. These are not something I will go into detail about here, because I only what the bright and shiny news here.

Brite and Shiny News

  1. Despite rests Brite Cast: The Rainbow Brite Podcast is still around. We released an episode in November of 2016. It's a special 2 hour podcast playing catch up with all the news that has to do with Rainbow Brite since our previous episode in June.
  2. I'm working on parting with a huge part of my personal collection. This will come into detail in another post, so keep a look out if you are curious.
  3. Rainbow Brite merchandise is in heavy flow, releasing the first Stormy Doll and Itty Bitty on Hallmark.com. If you can't find them in your stores you can order them online. ProTip: have orders under $50 sent to your local Hallmark store for free shipping.
I know I always promise to write more, but I write when I can, so hopefully that will be more frequently.
Until the next update!
Have a Rainbow Day!


Sunday, June 14, 2015

Personal Progress

Hello Color Kids,
I've had a lot of personal things to over come this year. From my health, personal theft and various trials and tribulations. Still I'm here. It's made updates slow, but its getting better.

I'm working on getting some things updated this weekend. The Official Rainbow Brite Facebook page has been releasing never before seen images from the making of Rainbow Brite and Star Stealer. If you aren't already following them, you should. They have also released preview photos of the new Itty Bitty line of Rainbow Brite toys. Very exciting information and you should follow them if you don't already!

If I can keep the momentum going, check back for more!
Have a great day!


Sunday, October 26, 2014

2014 Rainbow Brite Character Review (Appearance)

Hi Color Kids,
The new Rainbow Brite character designs have been slowly coming out all week! Today, the last Color Kid was posted and I couldn't help but want to review them!

A year ago before the show came out I actually did some soul searching regarding "if the color kids were re-designed, what could they be like?"

In the original 1980's British Audio books the Color Kids were given different accents, Patty O'Green was honestly Irish for example. So I thought that based on their names, what were some subtle changes they could do to provide different nationalities to each kid.

So I did a break down of the nationalities : NOTE: THESE ARE MY OWN THEORIES. THESE ARE NOT FACT
 Red Butler: Southern American
The name is very much a parody of "Rhett Butler" the male lead in Gone with the Wind. A character made famous by "Clark Gable". I thought it would be interesting if Red could actually be a southern gentleman. Though you will have to be careful with the "Red neck" comparison..har har.

 Lala Orange: French
Lala was always given "French" features, such as wearing a Beret, and being so fashion forward. Even her name "Lala" is very much like: "oh là là":  french phrase for surprise meaning "Oh my," "Oh, dear", or "oh no".
Why couldn't she be French?

 Canary Yellow: ?????
Canary was another "blonde" character like Rainbow. But the characteristics of the character weren't very defined, other then her liking to dance and having a very "sunny" personality. Someone suggested to me she could perhaps be Russian, because of the blond hair being such a characteristic in the culture and her being a Ballet dancer.

 Patty O'Green: Irish
Patty's name really speaks a lot to being "Irish", Her cute pigtails and freckles on her cheeks.

 Buddy Blue: Spanish
Buddy was always very Sporty, but his personality often reminds me of a soccer player, and Soccer  is the most popular sport in Spain.

 Indigo: Indian or African
The original Indigo was dark skinned, but I have seen Fan Art that makes her "India Indian", This can be traced to the fact that Indigo Dye was first mass produced in India, but her costume seems to be inspired by Arabian/Genie costumes or harem pants.
However, she can also be considered African, because Africa is also close to the Asian areas that inspired the color.
Like I said , I've seen in fan art, both ways.

 Shy Violet: Asian
Shy Violet's "bun" hair style, knee high socks, and shoes reminded me of Asian school girls. Asian schools have a dress code which includes such things. Primary/Elementary (age 6-12). She is a very "smart" character too.

Planeteers!
When I brought this up to a friend they said "Oh! So it's Captain Planet and the Planeteers!"

This made me laugh.

Anyway, the kids were released and here is what they look like! (See right)
I was surprised to see Shy Violet with those almond eyes! It was like they read my mind! That is how I really knew I wasn't the only one who had the thoughts about these characters.

Now weather or not the other characters are anything like I mentioned above, I have no idea. They probably have nothing in common with my theories, but I think Shy Violet, the one who has the most dramatic change in appearance is really sweet looking.

"Stereotypes"
A stereotype: a widely held but fixed and oversimplified image or idea of a particular type of person or thing.

I don't want to make something positive and turn it negative by including characteristics that can be considered stereotypical and mean. Some races and cultures may feel honored to be included! On the flip-side you are also going to have people angry over such a stereotype. And to those people I don't understand.

Shy Violet can still be smart and sweet no matter what "nationality" she is.

Now, there is a hint that Monday, October 27th there will be more surprises! I can't wait! Will we see the Dark Princess?  who knows! I don't!

Until then,
Remember, the power is yours!
RAINBOW POWER!


Monday, October 20, 2014

Rainbow Brite is BACK!

Hi Color Kids.

If you haven’t heard yet, I wanted to let you all know about the NEW Rainbow Brite Animated show! After 30 years our favorite color sparkler is back with an all new look and fun adventures on Feeln. It's a video streaming services featuring family friendly programming.

The new trailer for the new Rainbow Brite was released last week. And I have to admit I was afraid at first. I was scared because I actually liked what I saw and I felt I was betraying the first Rainbow by liking it. I love the original Rainbow Brite. She has been a part of my life for decades and she holds a special place in my heart. Several times in the past they have tried to replace her for a new generation and it hasn't worked. I have hopes for this new Rainbow.


In the beginning of the Trailer she is hyper and joyful and her happiness is infectious!

They have kept her young and fun and I think kids today will love her!

The new Rainbow is not mine, and I love my Rainbow, but I am also loving this new one. I've thought about it a lot since the release and I have concluded that I am not betraying her, my childhood or my fandom! Those memories are safe in my heart. There is a Rainbow in my heart, painted there decades ago, and it can't be replaced. But I think the new generation deserves their own Rainbow.

I know she is different, but kids today are different. I don't expect them to be the same as I was growing up. I was born in a time before the internet, and things are different. I have nieces and nephews that are nothing like me when I was a kid and I'm GLAD. I want them to be just as happy as I was if not happier, and that means things change. But as things change that doesn't mean we forget about the past.

This new Rainbow Brite show has shown us several things from the original show, not continuing it, but remaking it for a new generation. I see my Rainbow Brite in this new show. So far we've seen a new color castle with color kids, sprites, Starlite, Rainbow Brite and Brian! The Key to Rainbow Land, the pits, etc.

In fact in a previous episode of the Brite Cast I said: the new show needed to remember the original, and needed to include things the old generation would like for it to be successful. My exact words were “I'm hoping they will keep us in mind, because it is our generation that is teaching the new generation and if we don't like its not going to be shown.”

I DID NOT say that meant they had to remake the original show in the same style. I think the new show has included everything I had hoped they would. They are remembering us, honoring us, and this makes me excited.

Yes, the new Rainbow Brite does speak differently but kids today do speak differently. From “OMG” to “SELFIES! The 80s slang things were awesome, rad, rude, and it made that era fun.

History has a way of repeating itself. For example when I was in High School I was wearing vintage clothing my parents wore. When I go to the stores now I see the fashions I used to wear when I was about 10 or 12 years old. I never thought I would see the generation where my childhood would be repeated. But it also reminded me how my parents may have felt about my generation re-hashing theirs. Still its not a bad thing.

In relation to cartoons, there were cartoons rebooted in my childhood, even your childhood that were popular in decades before for us: For example: Let me bring up two of the most popular characters in history.
Bugs Bunny:

Mickey Mouse:


Too large a comparison? Then lets look at Garfield.


These are characters you love and have a special place in your heart, but they didn't always look like you remember them.

And that is just what makes a generation. It doesn't erase the generation that came before, but in enriches its history.

Rainbow Brite deserves another chance. She has waited so long and I want to give her this chance, not for me, but for every kid I know who I know will love this Rainbow.


The New Rainbow Brite airs online November 6th 2014 on Feeln.com

Feeln offers streaming family friendly programming for $4.99 a month or $47.99 a year.

You can also see more of the new Rainbow Brite on Facebook, Twitter, Tumblr. And of course Feeln.com

Also tune in to Brite Cast, theRainbow Brite Podcast featuring myself and Katy Cartee Haile of RainbowBrite.Net

Have a Rainbow Day!


Thursday, September 4, 2014

The Wrath of Con!

Greetings Color Kids!

It's been a few days past that of the Dragon Con event in Atlanta Georgia, and I am truly feeling it.
My costumes were perfect for the convention. All were very nice and light and comfortable in the heat and humidity. My shoes also held up nicely each day.

Katy Cartee Haile as Strawberry Shortcake
and Me as Pinkie Pie
I was able to meet up with Katy Haile from RainbowBrite.Net and she and I were able to share the rainbow with so many fans we saw! We promoted our websites and the podcast to many there who loved Rainbow Brite and took the time to tell us so.

Day 1: On the First day I dressed as Pinkie Pie from My Little Pony. This day was a "discovery" day where I spent most of my time hunting down the places I would want to visit later. I went to the walk of fame and also got autographs I wanted early. I then met with Katy after the Panel with C Thomas Howell and Cary Elwes.

Katy actually got to hug and meet Cary and squee like the Fangirl she is.  LOL

I fangirled on Goofy (aka Bill Farmer) on the walk of fame, but it was worth it. I also met Gigi Edgley in the elevator. She stood right next to me. I didn't know who she was originally. I said "You look familiar" she said "I was on a show called Farscape" and I gasped and said "Jim Henson's Creature Shop!" as I watched ALL those and loved it greatly. She was the hostess of the show. It was so nice to meet her, but I didn't take the interaction beyond that other then to show her to the escalator so she could leave to the event she was trying to get to.

Me as Rainbow Brite, Katy as Baby Brite
with Misc Rainbow Brite at DragonCon
Day 2: I dressed as Rainbow Brite and Katy dressed as Baby Brite! We went to a She-Ra Panel and met up for an 80's Cartoon photo shoot arranged via Facebook. I am not on many of those pages, I guess I should be.

That night I went to the Georgia Aquarium and met another Rainbow Brite there. It was very much a Rainbow Brite Weekend.

Day 3: My last day at the convention I decided to wear a less complex outfit and dressed as a Unicorn. Originally I had designed his outfit to be around a "Last Unicorn" ponch, which I was unable to get before the convention. I compromised by wearing a generic butterfly tunic shirt with long white skirt. The unicorn horn was designed by me, and I really need to make an online tutorial for how I did it so that other fans can make Unicorn horns.

Me as a Unicorn, Rambo Brite and Katy as Rainbow Brite
The last day I went to more panels and parties and even ran into a "Rambo Brite" cosplayer. I met him at my local con, but was unable to meet up with him because my costume melted. I really wish I had now! His costume was FANTASTIC!

Over all the convention was fun and I look forward to going to more now that I have a better idea of what to expect.

While waiting in line Katy and I recorded a quick Mini podcast part which should be up soon.

Since I got home from the convention I've had to deal with fatigue. I call this the wrath of con...the fatigue that follows such an event when you aren't used to it. I need to work on that for my next one.

Until then, have a Rainbow Day!


Monday, December 2, 2013

For Sale: the Key to Rainbow Land

Hi Color Kids!
Happy Holidays! Merry Christmas!
I want to give you an offer this Christmas. I will make a custom Rainbow Brite Key to Rainbow Land for you or someone you love for Christmas.
I am asking for $20 each key. This will get you a key replica painted to look like the picture below.

This key will be made for you, so if you prefer all yellow and no gold, that's what you get.

These are made out of plastic, not clay, so they will be more durable. You can wear it as a necklace, or just display it on your Christmas tree as an ornament.

The key measures 1.75 Inches Wide (the handle) x 3.54 Inches Long (the length) and about .3 Inches thick.

If you are interested please email me: twinkmail@rainbowbrite.co.uk

To make sure they are to you by Christmas, I would like to get any order this week only (Dec 2 - 6), so I can start making them.

I look forward to hearing from you!
Have a Rainbow Day!

Friday, November 1, 2013

My Rainbow Brite Costume

As a child I wanted to be Rainbow Brite for Halloween, but was unable to obtain a Rainbow Brite costume. But this year, the 30th anniversary of the Rainbow Brite brand, I decided to make it a reality.
I bought a vintage size 8 McCall's costume pattern and with my mother's help we increased the size of the pattern to fit me, as an adult. My mom chose taffeta as the fabric, because of it's good breathing and shape keeping. Since I live in Florida, the fall days are some what iffy. Between surprise rain, and heat and cold fronts, I know I wanted a costume that could hold up to it. Also, the fabric photographed so well!

A lot of it was experimenting with the pattern and a lot of mistakes and successes. My favorite part of the dress was a part that I designed completely from scratch: The Color Belt.

I made a removable color belt. To get the Rainbow as close to the real belt, I actually increased a real Rainbow Brite image from the 80's and used the belt image as a template. The Rainbow itself is felt, as the costume requested, but I made my own improvements

1: To make the belt have weight and substance I bought firm felt and made an actual belt base. I cut it into strips and sewed the strips together.

2: I wrapped the taffeta fabric around the felt belt, and made a pocket in the back to insert custom LED lights.

3: I bought battery operated lights and arranged them in a “Rainbow” pattern to back light my belt for a fun lighted effect. I wanted a sound effect box, but I didn't have one...maybe in my next costume...

4: I also added two over sized buttons on the back to mimic the real double buttons on a REAL Rainbow Brite image (from behind)

From head to toe, here is the costume

Head:

Wig: Blond Pony Tail Wig (Ebay) $19.99
 

Bow: Left over scrap taffeta from dress, Blinking Red Star pin from party store ($3)

Eyes: Blue Contact Lenses (Pinky Paradise) $21.99

Dolly Eye lashes: $4

Cheek Star: Foam Star painted purple

Basic make up: Pink lip stick, pink cheeks, pale make up (I'm olive skinned, so I had to lighten my skin to match the hair and eyes)

 
Dress: Shirt: homemade

Jumper/skirt: homemade

Crinlin: Homemade

Boot Covers: homemade

Accessories:
Twink Purse: vintage twink, stuffing removed, and zipper installed, taffeta scrap for strap

“Prism” Ball: Store bought blinking ball with rainbow strips and blinking lights

Umbrella: Large Rainbow Umbrella Store Bought with 2 strands of battery LED lights, sewn to umbrella. (Lights were $3 each)

Over all look: PRICELESS!

I debuted my costume at Mickey's Not-So-Scary-Halloween-Party in Disney World.

The costume was a big hit with fans. My mother came with me and she kept telling me how people were commenting as I walked by.

I stopped for photos a lot, and gave "star sprinkles" (foam star stickers) to anyone who asked for my photo or stopped me to comment on it. This included costumed families and Disney Cast members. One of my favorite is when an official Disney Character actually called to me...a real one! Sadly I was unable to get a photo with them because they went on break, but I love that my costume called to them.

I was told I needed to be in a contest that my costume was so well done. I blushed so much. It was such a wonderful time. I was told I made so many people happy and made their nights by being there representing their childhood and this character.

I hope I did the fans, the brand, and everyone who appreciates costumes justice.

This really was a dream come true. Some times you have to take your dream in your own hands and make it happen.

Also, don't forget to tune in to Brite Cast to hear mine and Katy of Rainbow Brite.Net's costume memories!

Until later,
Have a Rainbow Day!

Friday, September 27, 2013

Getting ready for a Rainbow Christmas

Hey fans.

This summer Rainbow Brite's 30th anniversary ornament was released and there are many fans from all over the world who want them. Sadly international shipping is not an option on Hallmark.com.

However in the season of giving and thanks I would like to extend a helping hand to anyone who would like one sent to them over seas. I live in the United States and want to help those who can't get these on their own.

I have checked with my local post office and it seems the postage to ship a package that small would cost about $10 parcel post.

If anyone would like an ornament please contact me here or email me via the "Contact" page on the RainbowBrite.Co.Uk website.

So shipping is $10 parcel post, or $19 priority. + $14.95 for the ornament

You won't pay anymore for the ornament then if you were to order it yourself. I am not upping the price or charging anything for this, and am doing it as a favor to any Rainbow Brite fan who would want one.

Have a Rainbow Day!
Renee'

NOTE: I am not authorized to "Sell" any Hallmark item, as I am not selling them. This is a courtesy for fans as a favor not for profit.

Thursday, August 8, 2013

Doll Repair Hint: Color Belt

One of the many problems with Rainbow Brite dolls is their Color Belts going missing. The dolls belts were originally glued on their dresses and after a few years many of them fell off and are missing. I decided to check for a way of getting a belt on missing dresses, so I asked a friend who did embroidery to help me. She took a few of my belt less dolls and looked up a pattern and attempt to put it on one of the older dresses. You need to be careful with this, because the dresses are made of nylon and could tear.
Either way, we were successful!
We located a nice "Shooting Star" pattern, and were able to adjust the colors to match, and put it on a dress. Here is the finished product:


The design also works on the larger dresses as you can see here.


You can find the pattern for this here: Shooting Star Pattern
I hope this helps you also!

Have a Rainbow Day!

Monday, July 29, 2013

My Rainbow Room/Color Cave: Update 04

Hey Color Kids,
I know it's been a long while since my last "Collection/Color Cave/Rainbow Room" update. I hit a few bumps. Beyond personal issues/illness I also hit some design bumps.

First, the shelves I painted seemed too tacky to use as is, so for my top shelf, I actually purchased two 7 inch wide pre-made shelves for the main boxed dolls. Also, I was short several brackets so I bought more.
Closet with painted shelves.
Then I attempted to arrange the shelves to best show as much of my collection as possible. Before I could put them up, I had to box them. You can find out the details behind making your own Rainbow Brite style display box in this entry here. How to make a Rainbow Brite Style Display Box.

It was when I created my original dozen and displayed them that I realized how much I really LIKED the way the boxes looked and also knew I was going to need much more if I wanted to display my WHOLE collection. My whole collection is NOT going to FIT in the closet.  I tried to display a few items I had, the core dolls from each release and this is what I got: 
The front of the closet with boxed dolls
As you can see the boxes look good. I love how the color pops for each doll. Still I have much more to display, and many more to box. This got me to thinking, I really need to use the whole room to display my collection, but I don't want to risk the dolls fading. So a NEW plan was hatched! UV Protective Film!

While at Lowes looking for brackets I turned to window treatments and saw some UV film to protect your furniture from fading. I selected the highest UV protection possible. While this does happen to be BLACK UV film, it does allow light and I can still use my window but it doesn't allow 99% of UV light which should keep my items from fading! I don't know about you, but I felt such a release of not being restricted. Between the custom made boxes to protect from dust and now the UV film to protect from fading, I can enjoy my collection even more.

That and when it comes to game playing and movie watching, I don't have to worry about window glare! 

So I am wanting to keep the main dolls in the closet for their protection, and  I started working on what I would display around my room, since I was going to be using the whole space for everything else I have. The space isn't finished now, and I will go over the details when they are, but here are some cute ideas that you may enjoy too!

One I like is Recycle Wrapping Paper: I have old wrapping paper from Rainbow Brite. This paper is so adorable, I wanted to use it in the room, so I went to my local Hobby Lobby and had a section dry mounted on foam board. This section of paper can now be mounted on my wall as a poster! I recommend dry mounting to anyone who has paper items they want to display. This isn't archival safe, but rather just for show. I will preserve a copy of the paper as well in my archives, but it is fun for other things. Also, considering how much paper you can get in a roll, you can give "posters" away as gifts to other Rainbow Brite fans!

Vintage, New and Homemade Posters!
Don't be afraid to DIY: Do It Yourself Projects: If there is something you can make on your own it is tons of fun and personalizes YOUR space to you! In my space I have become such a crafter! I share everything I make with fans as I do it because I think you will enjoy it too! I made Home Made Projector Night Lights for Rainbow Brite, Custom Display Boxes, and Posters so far! I had no idea how many ideas I had until I started working on this project. You never know what you can come up with too! Don't be afraid to try! and if successful SHARE it with fans! 

Oh, and for those who were curious of the left and right sides of the closet here are some pictures:
The Left Side
As you can see from the shallowness of the shelves I made a lot of room by putting brackets on the side of the shelve as well as the back. these side shelves also hold dolls. These aren't how my display is now, trust me. I've been moving shelves around everyday. I think they may move even more until this project is done. LOL


The Right Side
The Right Hand side of the shelve is also different. I'm attempting to use the closet as custom book shelves too. I keep a lot of the heavy items to the bottom of the shelves. This is incase anything does fall it doesn't fall far. You can see a lot of my books and videos here. This display will change too as I go through my collection.

If there is anything specific you were curious about with this project, or if you have any suggestions for my collection, let me know! I hope to have more for you soon, but if this takes a long time to complete, don't be discouraged. It's a learning process! LOL

Please be sure to check the website and this blog for any more "Do it yourself" ideas I may come up with to help with displays!

My current project is making more boxes for dolls (Variants) and cleaning up SPRITES! Oh boy the trial and error of cleaning those poor little guys.

Thanks for reading, until next time
HAVE A RAINBOW DAY!

Thursday, July 25, 2013

How to make a Custom “Rainbow Brite” project-able Night Light

This is a fun way to make a custom Rainbow Brite Night Light. Please note: this project requires tools and dealing with electronics, so please only an adult should attempt this project.

First take a “Projectable Night Light”. I chose a blue one with silver base. This one normally projects an underwater scene with fish.\


Next carefully take a tri-wing screwdriver, (you can find these as part of a security screwdriver set at most local hardware stores). Remove the three triangle shaped screws.

Next carefully remove the front of the silver plate. This will expose the inner workings of the night light. We don't want to mess with any of these.

Next carefully dismount the projector ball. It is held on with a spring on each side. This allows it to rotate yet still brings power to the LED light inside.


Carefully take apart the projector ball and remove the projector inside. The small round film that is the slide image will come out. This is the image we will be replacing.

What can we replace the image with?

You can use two things that I know of.
1: a view master reel. The view master film frame is nearly as small as the projector film. You will need a hole puncher or Xacto knife to cut the correct shape.

2: a Rainbow Brite projector film cell. These were from the Rainbow Brite and the Star Stealer trailer from the 1980's. The film cells are very big in comparison to the tiny cell you need for the projector, so select a scene that is a wide shot, or a specific character you want projected. You will also need a hole puncher or Xacto to cut the film in the correct shape.

Next, slide the new cell in the place of the old one and put the projector back together.

Once back together, you should get something that looks like this:


the method I chose was a Film Cell. It is of Rainbow Brite, Starlite, and Twink riding a rainbow. It's a nice “window” in to Rainbow Land that I can project onto my wall, ceiling or anywhere I choose. 
Please note the clarity of the image depends on the quality of the image, the distance from the light to the surface you are projecting on and if your cell is laying completely flat inside the projector. 


You can currently find a set of cells on Ebay here.

If you try this project, what method did you do? And what image did you get?

Let us know!
Have a Rainbow Day!


Tuesday, July 16, 2013

Rainbow Brite on Zazzle: a Review

Hello Color Kids!

For the past few years Hallmark has had an online store via Zazzle where you can not only order printed items, but you may also customize the prints for yourself or the Rainbow Brite fan you know!

I decided to order two items to review them. I wanted a poster for my office space, but nothing as large as my theatrical poster. Many of the real Rainbow Brite posters that were given away in magazines were not as large as that either. I chose a nice classic print in 11 X 13.20 inch poster ($11.75). I selected the value matte finish.
When I received my poster I was very impressed by the print.
Poster Print
Print Details

I'm sure the print quality varies depending on size of the poster you order, but for the size I requested I like it. The paper may be "Value" but it's actually much thicker feeling then a vintage poster.

I also ordered a custom item. A custom button with the classic Rainbow Brite logo ($3.60). I made it simple, with a "Proud to be a Rainbow Brite Fan" as the over all message. It would be a nice addition for just about anything you wear.  You can customize anything you like with whatever you want it to say. A name, a date, etc. Not a bad price for something to customize. And then there is the size: 2 1/4 inch round. They used to charge that much for the old ones at HotTopic, and those were the size of a nickel. I think it's a great value.


Zazzle has a bunch of prints you can customize and make your own! Even if you share your order, you can get a discount on the next. I recommend keeping an eye out for shipping deals, also.

If you have ordered a Rainbow Brite custom print from Zazzle, let us know!
Have a Rainbow Day! 


Monday, July 15, 2013

How to: Make a Rainbow Brite Style Display Box

How to make a Rainbow Brite Style doll box
Rainbow Brite Dolls in custom boxes
This is a cross post from the main website tutorial here.

Tools you will need to re-create the box
a: Utility Knife (for heavy cutting)
b: Xacto Knife (for detail cutting)
c: Ruler/yard Stick
d: pencil
e: Scoring Board (for making creases)
f: rubber gloves (to minimize the oil from your hands from over handling.)
g: glue
h: Velcro with adhesive back
i: silica packets (optional)
j: poly bags/head wraps for dolls (optional)

To re-create my Rainbow Brite Doll box, I used an old one to get the measurements and parts.

The box consisted on the following:

A: 1 Box
B: 1 Cardboard insert
C: 3 Lengths of plastic coated wire.
D: 1 clear plastic window (9 ½ in x 6 ½ in)


To make each box, I need a hard template/stencil to re-use as I need a new box. I decided to buy some foam core board from my local hobby shop for this.

I clamped the old box down flat onto the foam core board and traced the old box onto the surface. The clamps keep the box from moving as I go around with my pencil. Include the center/window of the box as well. Once done I remove the old box and use a box cutter/utility knife to cut out the shape. It is best to use the Xacto Knife for the window, as you need to be detailed with the curve of the shape if you intend to duplicate the same curve.


If you do not have an old box to make your template from, you will find measurements below for what I used.
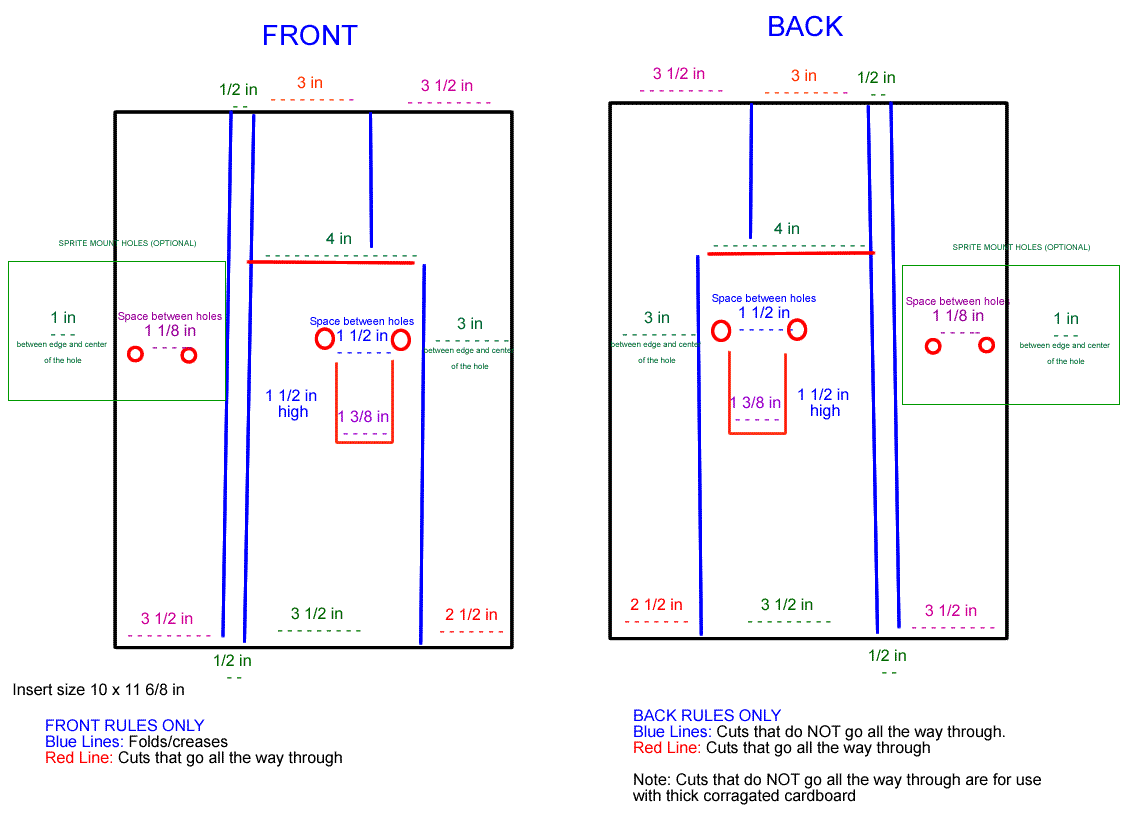
Insert Measurements (Click to enlarge)
Box Measurements (click to enlarge)


Now lets start making your box.
You need the following:

A: Heavy Poster Board (minimum 18 3/8 in x 18 3/8 in is needed for each box)
B: ¼ sheet cake board (or 10 x 11 6/8 in corrugated card board)
C: Spool of clear plastic coated wire (9 ½ inch lengths are used to mount doll)
D: Transparency Sheets


The box itself is made out of a thick poster board I got from an office supply store. Chip board is too thick, and regular poster board is too thin. The heavy poster board is the closest to the real box weight I was able to locate. You can make one box per sheet of poster board.

To create your box, clip the template to the poster board. I find putting it next to the corner of the paper will assure you get a straight and even line for two sides of your board.


After you have traced the outline, un-clip the template, and use a yard stick and the utility knife to get a straight cut around the other sides of the outline, so you have a rectangle. The other parts of the box are triangles, so use a ruler to assure those straight cuts, and finish cutting away the other negative areas of your outline.


Now that you have your box shape cut, you need to make the creases. The best tool for this is a “Scoring Board”. Martha Stewart has a nice large one available at most craft stores.


To score your box, lay the box on the scoring board, and using it's tool, press firmly and follow the groove from one end of the box to the other. Do that for all areas that need to be creased. This includes the folds at the top and sides (see picture)


When you make a crease it will darken the area but this will not be visible when you fold the box.

Next cut the window out of the center of the box if you haven’t done so already, and the extra cut in the closing flaps. You should know where this is now that you have made your creases.


Next you will need to glue down your window. The transparency sheet is too wide to fit as it is, so you will need to cut off the extra width. Once cut in to the correct size, draw a line of glue around the inner window of the box about a half inch. Once it's done, place the clear transparency film down over the window. Press down on the glue trail, and move your finger out away from window. This will spread the glue out and make sure it lays flat.


Lay the box down and let the glue dry.

After it has dried, fold the box on the crease you created until it meets the end. Draw a line of glue along the end and use a pair of clips to clamp the two pieces together. Make sure the seam is flat and the glue is not leaking out the cracks. You can better assure the seam if you used two rulers on either side of the board and clamp that down so that it's being held down from one end of the box to the other.


If you don't do this, you just need to hold down the seam by hand until it sticks enough on it's own and the clamps on the ends will keep it from coming apart.

While this is drying, you can work on the insert.

The insert for the box was originally a colored piece of very thin cardboard, but I wasn't able to duplicate this. Instead I used ¼ sheet cake boards. It is the correct width. You will need to trim off the extra length from the top.


Next comes the detail cutting for the insert. To assure the proper folds to fit in the box you will need to make a series of cuts in the back of the board (the brown part). Only two have to go all the way through the board. The others are only for the folds, so only have to be through the brown part.


You also need to punch a few holes through the cardboard too. These holes are what the wire goes through to mount the doll.

Depending on what doll you are mounting you may need more then two. All of the box inserts will need to hold the doll body. You will need extra parts to hold hair. For example the one I am working with is for “Rainbow Brite”, and in addition to holding her to the board, I also need a wire and holes to hold back her ponytail. Also, if your doll has a sprite, you may need to punch a set of holes to mount the sprite.

After all boards are cut and the box is dried, it's time to put the box together.

Fold in the flaps of the box and secure the box with Velcro. This way you can open the box later to adjust or add items as you find them.

Next cut wire, 9 ½ to 10 inch lengths.


Before mounting your dolls you may want to adjust their hair and wrap them. If you do this, you can use 4 – 5 inch poly backs cut into 2 inch rings to wrap around their heads and keep their bangs down.

Once you know your doll is ready, put the wire under the dress and out the sleeves. Feed the wire around the back of the doll and into the holes you punched in the center of the board. Turn the board and doll over and twist the wire firmly. When you turn the board back over the doll is now firmly mounted in the middle of the board.


Next, use another length of wire to secure the doll's hair if it needs it the same as you secured the body of the doll.

Now, secure the doll's sprite if available.


Lastly, slide the cardboard insert with mounted doll into the box.
Rainbow Brite and Twink reboxed!
Secure the other end of the box with Velcro. Add a silica packet if you like to keep away moisture, and you are done.